We at HYPERVSN are in love with our truly innovative product, and want to do everything we can to make you fall in love with it too. In our first article, we explained what should be done to complete the HYPERVSN Wall installation process safely and effectively. In this article, you’ll find best practices to avoid any software issues during Wall setup, and make each and every installation a success.
After having finished the HYPERVSN Wall installation process successfully, there are several aspects that should be kept in mind before displaying your stunning 3D visuals.
Having profound experience in dealing with our partners and clients’ technical issues, we’ve outlined below the most important tips one should follow after installing HYPERVSN units.
Activating your Wall Devices
After the HYPERVSN Wall units and the MasterBox have been mounted and connected, you should connect to the MasterBox Hotspot. Then open a browser and enter 192.168.0.1 into the browser address bar to activate all units.
As mentioned in our previous article, a wired LAN connection is needed to activate the MasterBox. At this stage, it doesn’t need to be connected to the Internet. However, a Wi-Fi connection with access to the Internet should be established to activate the HYPERVSN Wall units. On the Web manager page go to the ‘Devices’ – ‘Networks’ tab, hit ‘Add Network Preset’, and add the available network. After clicking ‘Synchronize’, you’ll see a message on the units; ‘WI-FI SETTINGS UPDATE SUCCESS’.
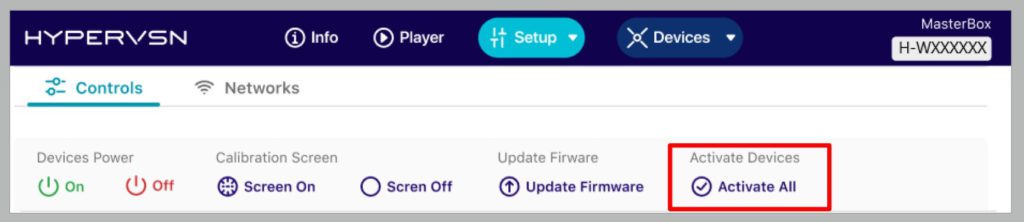
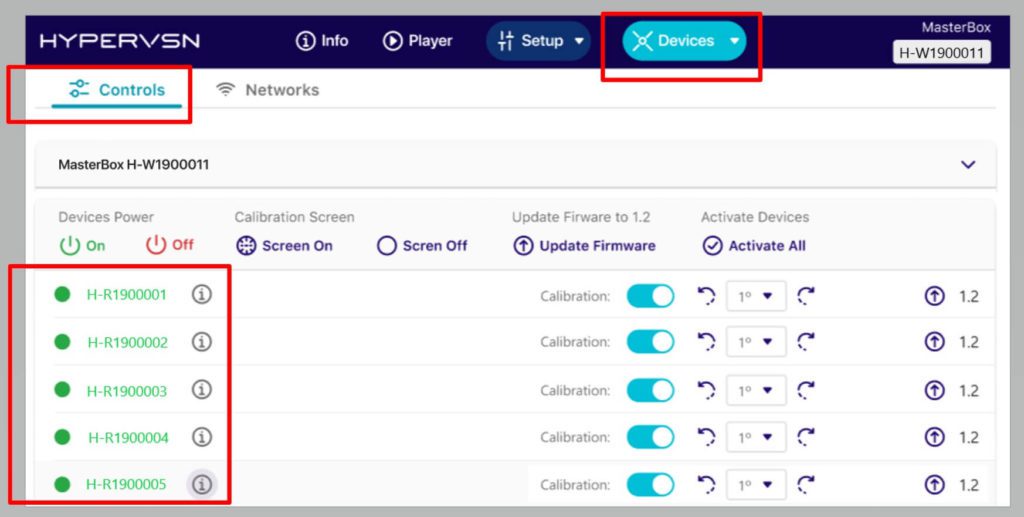
Then you may go to ‘Devices’, choose the ‘Controls’ tab and click ‘Activate All’.
The Wall Application
Once the units are activated and connected to a certain Wi-Fi signal, you’ll see them on your CMS account. Make sure you’ve activated the Wall Builders subscription on all of them, otherwise a ‘Not Activated’ error message will appear in the Wall App.
After it’s all ready, go to the Wall App (login using your CMS credentials), choose the ‘Devices’ tab and make sure you can see all your devices listed.
Please keep in mind that the MasterBox should be connected to the same Network via Ethernet. The Internet is not required during this stage, but later you might need it to download your media content from the Cloud to the Wall App Local Library. Note: you may also download it prior to the installation, in this case you won’t need access to the Internet.
What can you do if you can’t see the devices in the Device tab?
Please make sure your laptop is connected to the same network that your devices are connected to.
If there are no devices listed, check if the devices are connected to the router. In order to do so, you may access your router (open Winbox if you are using Mikrotik) and check the connected clients. Alternatively you can scan the network using any scanning software. This way you can see all clients connected to your network and their IP’s.
If you cannot see the devices there – this is an issue, so you have to connect the devices to the network.
If they are there, but don’t appear in the Wall App – it’s possible that some antivirus programmes or Windows Defender is blocking the Wall App – please disable them. You may also find each device by its IP in the ‘Add Device’ option.
After you’ve made sure you can see all devices and the MasterBox in the Wall App, you may proceed with a layout. Go to the ‘Walls’ tab, and click ‘Create layout’. Wall App will prompt you what you should do on each step; for your convenience you can find all the details needed at every stage in the Wall App User Guide.
Necessary Updates
In order to provide stable operation, don’t forget to update your devices, MasterBox and Stators with the latest versions. Note:Stators should be updated after the MasterBox. You’ll find a step-by-step guide at MasterBox Operating Manual.
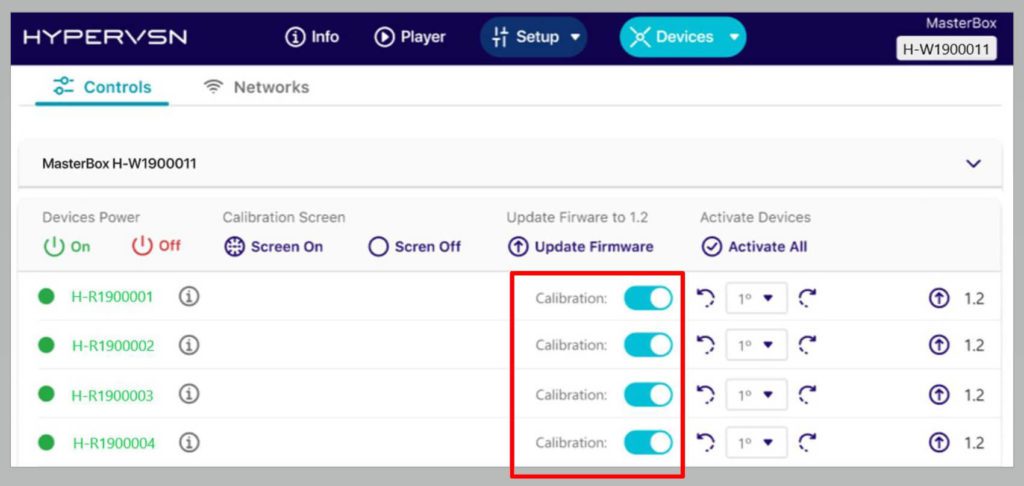
After you’ve created a layout, go to the MasterBox Web Manager, choose the ‘Devices’ tab, and click ‘Controls’. There you should see all your devices.
If you cannot see them, please return to the layout creation step. Turn on the calibration screen and adjust the devices’ rotation, if needed.
Check pp.28-29 of the MasterBox Operating Manual in case you need more information regarding the process.
Uploading Media Content
When the layout is created, you may start uploading videos:
Download media content from the Cloud. As stated above, you can download it prior to the installation; it can save you time and internet traffic.
Once it’s prepared and downloaded, you can find it in your Local Library. Select the videos you want to have on your playlist and choose between two upload options:
via Wi-Fi, meaning the content will be sent from the application to each device;
via SD card, meaning the content will be processed and saved on your PC for further upload with an SD card. This option might be faster and safer if your Wi-Fi area is congested.
P.S. Create Smaller Installations with HYPERVSN Wall
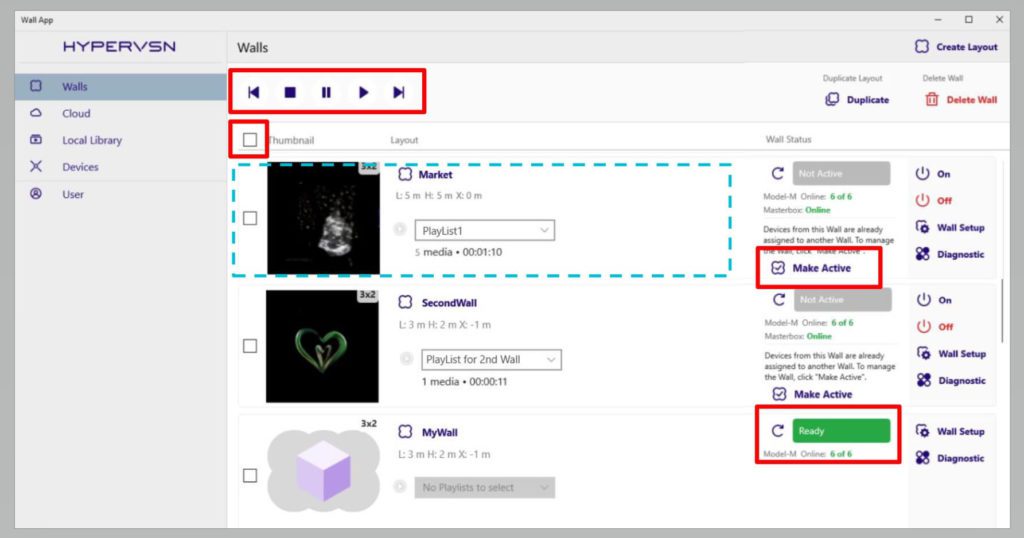
Sometimes you may want to use fewer devices than there are in your HYPERVSN Wall (create a smaller Wall out of the larger main one). In this case, you can create a new layout out of those units you have. Please go to the ‘Walls’ tab, click ‘Create Layout’ and choose the one you need. When assigning devices, select only those you want to use.
If the Wall App shows you a message stating the device is being used in another Wall, continue creating the layout.
When it’s done, you can activate the Wall by hitting ‘Make active’. Once it’s done, you may turn on/off, upload content and switch playlists on these units only.
We strive to make your experience working with HYPERVSN as smooth as possible. If you have any questions at any stage of the Wall setup process, please contact our expert Tech Support Team; they’ll provide you with quality assistance at any step of your journey.